Showing posts with label Artemisian Costuming Challenge. Show all posts

Sunday, January 1, 2012

All the bells & whistles...Final Submission Post

All items were handsewn, created within 2011 and I am considered NOVICE - having never handsewn before and only this year having started to sew my own garb on machine. 

Layer 1) White Linen Shirt - My shirt is based off the Thorsberg bog find in Germany which dates from the Roman era between the 1st and 3rd century AD.  It is a long sleeved woolen garment that fit close to the body.  It is constructed of simple rectangles for the body with a slightly rounded opening for the neck and has tapered rectangles forming the arms.  The side seams on the body are not closed below the hips. 

Under shirts & tunics remained largely unchanged as far as we know well past the 11th century, one difference is that many of the shirts up to the Viking age do not have gussets under the arm.  Therefore I found this shirt to be the most compatible from references regarding the Norman male common dress.  I did add a slit to the neck for ease of going over my head and I find that the look of it cinched together using a pennanular brooch under the kirtle is my preference.  I also added gussets to the shirt to allow for more movement as my shoulders are very broad.

I used white linen fabric and white linen thread which I treated with natural beeswax.  I drafted my own pattern based off photos and drawings of the find.  I assembled the entire shirt by hand.  All was created within 2011.


Layer 2) Wool Kirtle (HANDWORK: Textile Arts -Woven - Fingerloop Braiding)- There is not a tunic/kirtle known to be specific to Normans from the 11th century though there are tunics found from that time frame.  There are many depictions & configurations of tunics and how they are worn within the Bayeux Tapestry.

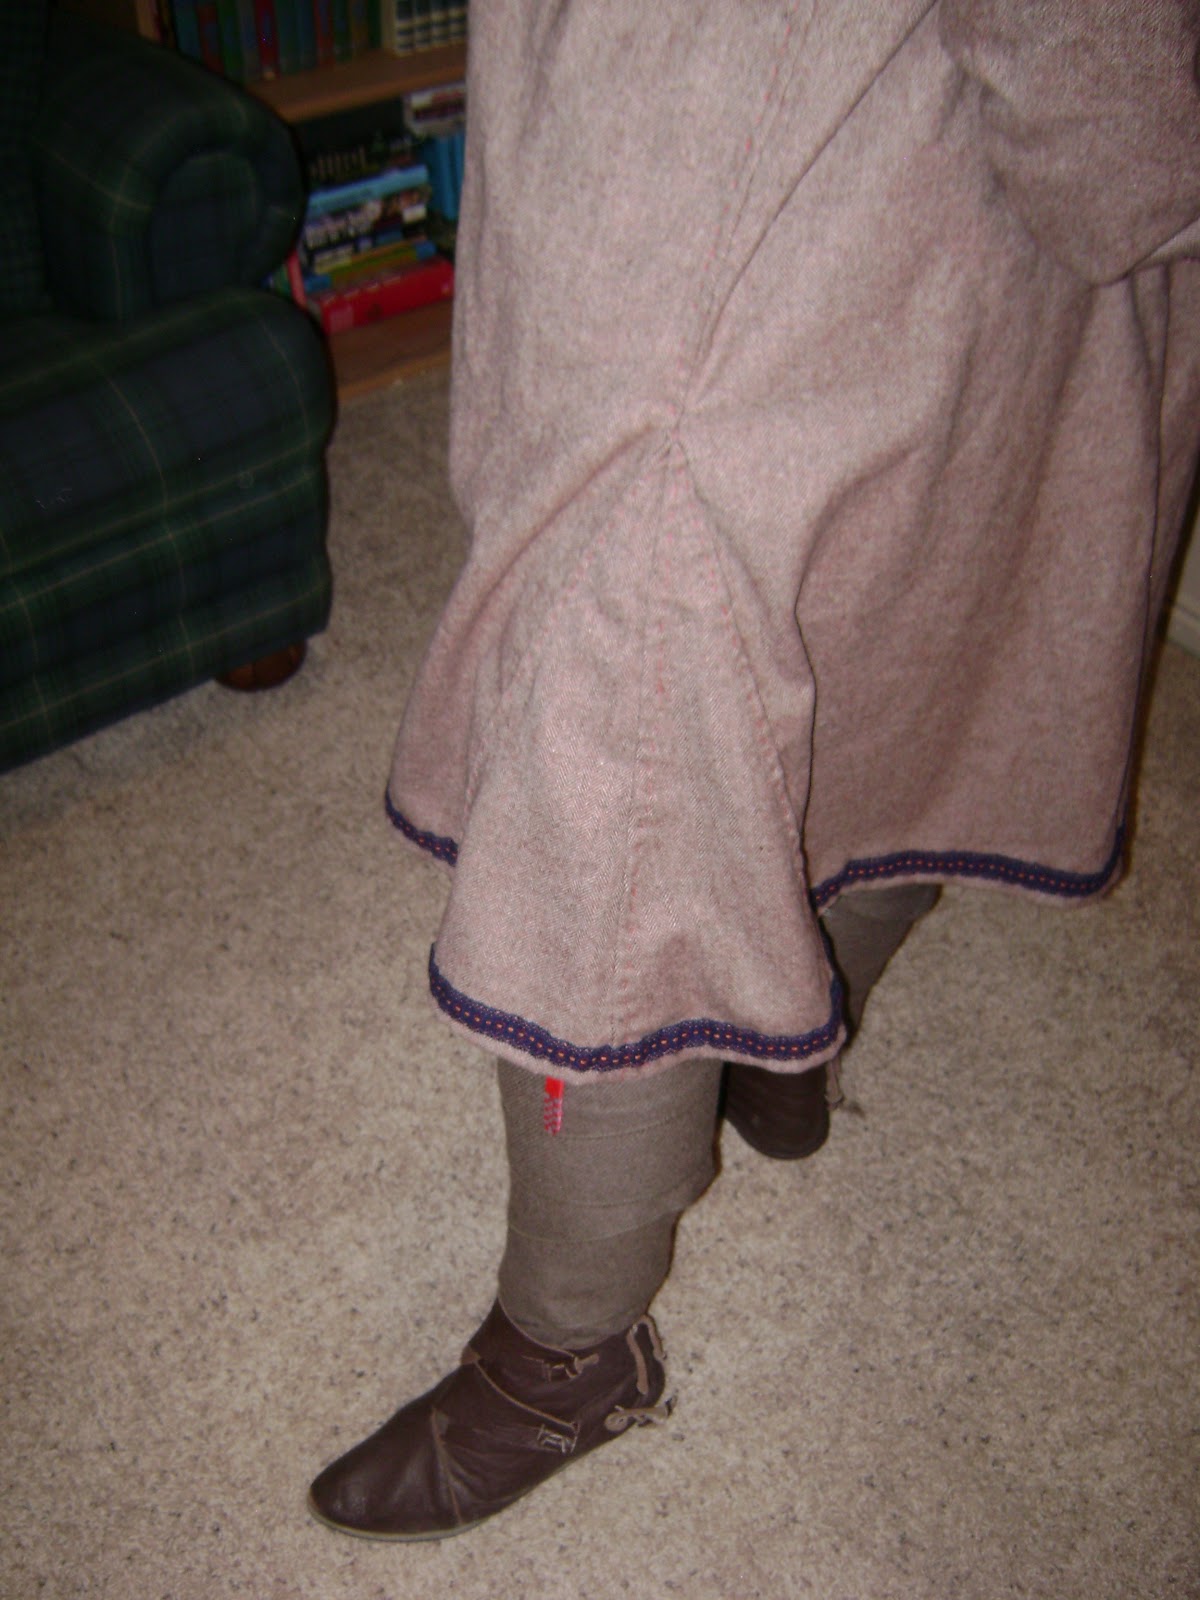
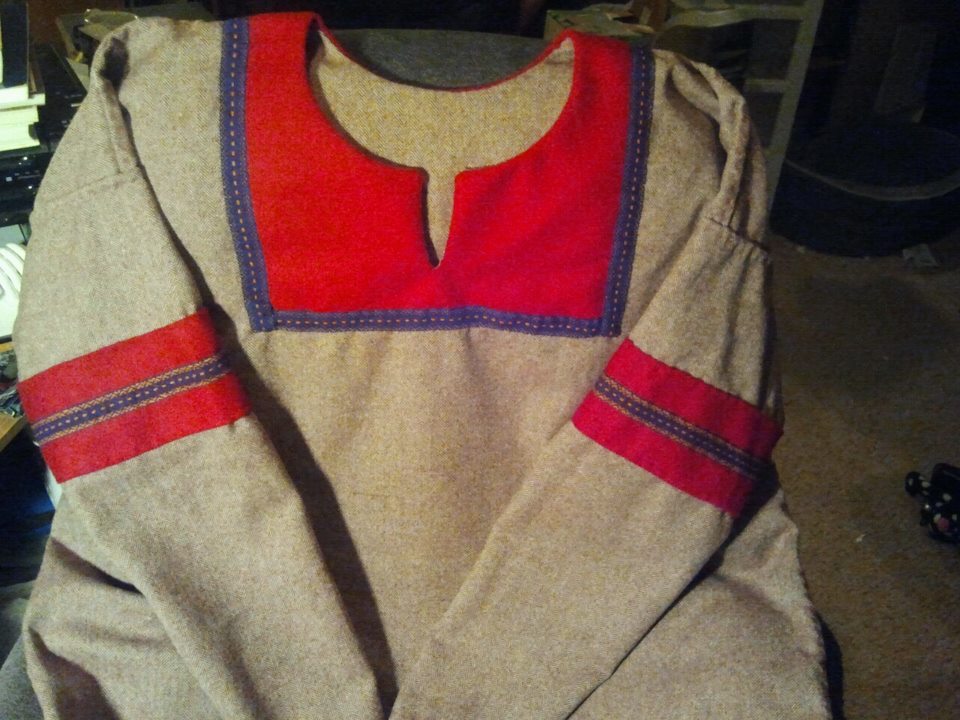
My Kirtle is based on the Skjoldehamn Kyrtle and dates to 995-1029 CE.  It is made of 4 shafted twill wool.  The garment is made of one piece for the body with 4 gores added from the waist to the hem at the knee.  The arms are tapered trapezoids with gores under the arm. 

In the Bayeux Tapestry there are many variations to this tunic, therefore I chose what would work best for me.  I prefer not to do 4 gore inserts, I only chose to do the 2 side gores.  I also chose not to inset gussets under the arms since I had done that for my undershirt and find 2 separate sets of gussets to be quite bulky.  The kirtle is over sized enough that I do not need to worry about room in the shoulders, therefore the gussets were left out.  I chose the yolked neckline as I think it looks the cleanest and nicest.  Plus as a novice, the trim lays out MUCH easier with this design. 

I used white herringbone wool and red wool fabric.  I used matching linen thread which I treated with natural beeswax.  I added purchased wool trim to the arm bands, yolk and hemline.  I also fingerloop braided my own trim for the cuffs using 50% Silk-50% Wool yarn.  I drafted my own pattern based off photos and drawings of the kirtle.  I assembled the entire kirtle by hand.  All was created within 2011.


Layer 3) The Wool Circle Cloak - There are several finds from the 11th century regarding cloaks and the Full Circle cloak is one of many.  There are references within the Bayeux Tapestry as well for both circle and square cloaks pinned at one shoulder. 

I chose a lightweight wool and did not line my cloak as I prefer to have the least amount of weight on my shoulders as possible.  I also do not get extremely cold at night so it is very rare that I wear a cloak at all.  But on occasion I have wished I'd had one so I chose to make that my 3rd layer. 

I used purple wool fabric and lavender linen thread which I treated with natural beeswax.  I drafted my own pattern based off drawings and photos of various circle cloaks.  I assembled the entire cloak by hand.  All was created within 2011.


Layer 4) Wool Phrygian Cap - Again, this type of cap is seen in various parts of the Bayeux Tapestry.  I did use a pattern which I found online (http://housebarra.com/EP/ep06/16cap.html ) which is referencing the Gaulish, Frankish and Anglo-Saxon caps.  I lined the wool cap with black linen for added warmth.

I used black wool fabric, black linen fabric and purple linen thread which I treated with natural beeswax.  I also used purchased wool trim that I picked up at Crown Tournament in October 2011.  I assembled the entire hat by hand.  All was created within 2011.


Extra Accessory: Leather Garters (HANDWORK: Leather-work - Decorative) There are references to garters used to hold up wool or linen hosen.  There are also 14th century references to the Order of the Garter.  There is not a lot of reference regarding the use of leather specifically, but there is much speculation that leather may have been used, although woven garters were mostly seen. 

I chose to use leather, and to dye it red as I am Squired to a Knight and I wanted to pay homage to him.  I normally wear a red sash to denote my Squiring, but have also felt the need to have a separate belt at times.  It is more SCA tradition to have your Knight's device or badge on your belt.  While I am in the process of embroidering my Knight's badge on my sash, I wanted to make my garters stand out.  I added my Knight's goose (his badge) to my sword side garter and because I am a fighting member of the Conroi Bras de Fer I chose to add their banner (red & white check) to the shield side garter.  Whether this was specifically done in period, we will never know but it was a personal touch I wanted to add to my accessory. 

I used vegetable tanned leather from my personal stash and red dye which I treated with a commercial sealant.  I drafted my own pattern based off other garters I have seen.  I purchased the 11th century buckles at Gulf Wars in March 2011 ($6.00/pair) and hand decorated the tips.  The garters were fully created in 2011.


COSTS:  The only things I did not have in my stash were linen thread and the Wool/Silk yarn for my fingerbraid trim.  I did also purchase the buckles for my garters & wool trim but these were done regardless of the challenge.  I do not have the actual receipts but I can tell you the costs. 

London Derry Linen Thread $1.90/spool (I have not used a complete spool, even if you combine the various colors I have used in the project as a whole but will count all 4 colors as separate spools).  Total $8.21 (w/tax)

Impressions 50% Silk 50% Wool yarn - $4.49/skein  Three skeins were purchased but not used completely but for calculations I will count all 3.  Total $14.55 (w/tax)

Wool Trim at Calontir Trims during October Crown Tournament $1.25/yard.  Approximately 10 yards used between kirtle and hat.  Total $13.50

Buckles purchased at Gulf Wars - $6.00 for the pair.  Total $6.00 (no tax)

Total Expenses for Challenge: $42.26

This has been a wonderful experience and quite the challenge for this Novice!  I appreciate all the help, input and instruction everyone has been so helpful in giving.  I wish you all the best in 2012!!!

HL Helchen the Rogue of Capua

Friday, November 25, 2011


Well I bit the bullet and started the wool cloak tonight.  I was out & about all day today checking all my favorite fabric stores to see exactly what I wanted to get to make myself a bliaut but I couldn't find anything I liked as much as the electric blue wool I had gotten eon's ago for my cloak.  Its light weight, a tight weave and I love the feel of it.  So I decided to use the 4 yards of heathered purple wool for my cloak instead.  I have had it in my stash for quite awhile now, and while its a looser weave, I think it will work quite well for me as a cloak.  I don't normally wear a cloak usually but have found this past camp season that I wouldn't mind having one around (although I found that sharing one with someone warm when I was in dire need of heat was extremely nice I must admit). 

The purple is light enough that it shouldn't be too heavy on my shoulders, the one I made Magnus was ungodly heavy!  Plus, I don't think I will get overly hot wearing it but it should keep in quite a bit of warmth considering I usually am already wearing linen & wool.  The only time I really want a cloak is when I belly dance...hence the fun time sharing >;p

I went with a lighter color linen thread to give it some contrasting decoration.  I think the running stitch I will do along the hem will work in well with the flat felled seams along each section since I am not going to add any sort of trim to the cloak. 

I only had 4 yards of this wool but it was 90 wide.  So I actually put the selvages at the top & bottom and cut the triangles through the middle.  I know that's not really cutting along the bias but given the weave of the wool I don't think it will be a problem.  Again, going with a full circle would just make the cloak a lot heavier than I would like and since I usually have one side thrown over my shoulder I don't see how having a couple sections short of a full circle is going to affect the look of the cloak at all. 

All in all, doing it this way keeps me from having to purchase more wool so the only thing I have actually bought for the challenge thus far is linen thread and the trim on my kirtle.  Everything else I have had in my stash.  So all in all, I've spent under $20.00 so far! 

Although Jenet has put it in my head I should make RED linen braies hehe...so I may actually go buy some red linen tomorrow with my 50% off coupon!

Rogue

Tuesday, November 22, 2011

Kirtle is done!...maybe...


The Herringbone wool kirtle with wool accent & wool trim is complete.  I think.  I had JUST enough trim to do the bottom and I mean JUST enough...I literally have less than 1/2 an inch of it left lol.  I may still do some fingerloop braids to go around the edges of the neck and the wrists.  It just seems too plain to me but I don't want to do a blanket stitch with the herringbone pattern. 

I ended up flipping the trim on the collar, I really loved both sides so I figured that if I did one side for the arms it should be perfectly fine to do the other side for the collar.  I matched the collar for the bottom trim. 

Its a little bit big, and the shoulders are a bit wide...I really need to get someone to measure me PROPERLY so I know exactly what width I really need to use. But it still fits very well and its a good length too.  I am VERY happy with it.

100% hand sewn
Herringbone wool Kirtle
Red Wool accents
Wool trim
Linen Thread

Monday, September 12, 2011

Surprise birthday present for Magnus...shhhhh!!!

Since I know he has no clue this blog is out here I am fairly safe to post the progress of his birthday cloak.  I decided to take up the 50 before 50 challenge and my goal is 50 hand made gifts by 50th year.  So the first of my gifts is for my Squire Brother Magnus.  He is an 11th cent. Varangian guardsman.  He bought the 8 yards of RED wool almost a year ago and it has sat in my house waiting to be made since then. 

He just turned 26 and I could not figure out what to do for him for his birthday.  Then it hit me...he still needs his cloak & I needed practice handsewing.  So, I decided to make it for him.  I feel guilty because I didn't use linen thread, he had purchased heavy coat thread for it already.  But it is fully hand sewn and all thats left now is rolling the collar, sides and hem. 

I had thought about applicqueing bear paws on the front but I don't know that I will have time to do it since I want to give this to him Saturday morning at Harvest War. 

I had originally thought that I could count this as my ACC cloak peice but alas, as I said, I did not use linen thread, I have one back seam that is turned in the wrong way and the nap of the wool doesn't match on all sections.  A couple of them got turned over to the other side and I didn't realize it until after I had finished the section.  So, I really don't want to have anyone judge me with such blaring mistakes already.

But it was great practice and I enjoyed doing it, and it still counts as 1/50 of the other challenge!!!


R

Monday, August 29, 2011

Knight Time ...

I got to spend some quality time with my Knight (Count Ralf le Bigod) yesterday afternoon going over patterns for braise and how he does his awesome looking hose.  I "think" I will be able to copy his pattern for hose pretty easily.  Unfortunately he has chicken legs so no way can I just use his pattern darn it.  The man has no calves....seriously...they're like peglegs!...no wonder his winnegas ALWAYS stay up! 

Anyway, after we discussed the patterns we got into a really great conversation about period underwear & why I would wear them.  Oddly enough I had never even considered WHY my personae does what she does.  I know WHAT she does, its like she just popped out ready made and thats who she is, but I never really bothered with the Why.  I have done some research and have a lot of my basics figured out but to drill it down to "Why does your personae wear mens underwear?" was never a thought. 

I know many people really don't have their own personae fleshed out and thats perfectly fine.  In my previous SCA life as a 14th Century Scottish woman I made up reasons why I fought but it was all conjecture.  Nothing was truly supportable should I have really wanted to document my history but it suited me and no one ever criticized me about not having something fleshed out.  Even now, I don't think anyone would do that really.  But to those of us that enjoy such things and "Would You Like To Know More" (to quote Starship Troopers hehe) it gives us even more insight into our alternate beings hehe.

It excites me now to know I can fully support why Helchen does what she does, wears what she wears and why she fights.  Everything can be documented - right down to WHY she would wear mens underwear and even to why they are the color they are (or will be once I make them hehe).  I am amazed at the levels of detail knowing my personae's history opens up to me.  It also makes this challenge that much easier.

I was having problems with my documentation.  I have never done documentation before and I thought you had to do things exactly like the period references you find did them.  I was confounded when I was using two different examples for my shirt and one had gussets and one didn't...so how am I supposed to make the shirt?  After much discussion with gloriously knowledgeable friends I realize the references are simply that.  I simply need to show what WAS done in period and why I am doing MY shirt the way I did it.  Which rolls into...my personae would have done it this way because....

So yea I am breathing MUCH easier now with the choices I am going to have to make regarding fabric, design and embellishment because its all based on Helchen and if anyone knows her best...(and knows why she wears men's drawers)...its Me =)

Rogue
(who occasionally wears men's underwear...in her real life too)

Sunday, August 21, 2011

Shiny...The 1st item in the ACC done!

My shirt is now done.  100% handsewn and I have the pin pricks to prove it!  I started the shirt on Saturday August 6, 2011 with cutting it out.  It sat, due to my hesitance on flat felled seams until Tuesday August 16, 2011.  I am pretty happy once I got to sewing it only took me a few days to finish it.  And that was only working on it an hour or two each night. 

I have learned pre-pinning works great but for hemming I do much better rolling it as I go.  I also love love LOVE the beeswax that Mistress Bianca gave out at her collegium class.  That has saved me many times.  I just slip the little pouch into my cleavage to keep it warm and anytime the linen thread got rough I slid it out!  Works like a charm.  I will definitely be melting down my big blocks once I find out what type of mold she used.  It looks like a mini Reeses peanut butter cup.

Some of my beginning seams are a bit uneven but by the end of the shirt I pretty much had the spacing figured out and I am very happy with the outcome.  The opening at the neck may need to be altered a little bit but I am waiting until I wash the completed shirt before I change anything.  Fit was good although I could probably take it in a couple places.  I wasn't sure on the seam allowances for flat felling so I left a little extra in the cut. 

I will say gussets & flat felling are a PAIN IN THE ASS!!!  I almost went with the running stitch to forgoe the flat felling but it seemed (seamed...get it lol I crack myself up) to work out just fine.  But agan..P.I.T.A!!!

All in all, I am a proud girl.  I haven't ever made anything like this by hand and it was actually very therapeutic just to sit, watch Firefly & sew.  Although now I will need to find a different series for each part of the challenge lol!


I thought I was getting in over my head with this but right now, I think I will do ok!  Thank you to everyone who gave me input about the gussets & seams.  Here is a photo of the finished shirt.  I will save all the documentation photos I have for the finale =)

Rogue

Tuesday, August 16, 2011

Flat Felled Seams!

Well it was tough but after Bianca's class, various videos on youtube, talking with friends in the ACC & reading an online article on period sewing techniques http://www.marquise.de/en/themes/howto/technik.shtml, I finally felt ready enough to start sewing.  It's odd because I would normally have had this thing whipped out in under an hour on a machine.  So far...I have one shoulder seam done!  LOL =)

I took some shots of the seam because...well...I am pretty proud of myself!  I know its not perfect but I am excited to have it truly started.  I did get to discuss the process of documentation and what the process is from a find to what you hold in your hand.  That helped a lot.  I realize I was truly trying to overthink the whole process...which to those who know me, should not come as a complete surprise ROFL!


The top picture is the rightside and the bottom picture is the underside of the seam.  I also have managed to gleen a few linen threads long enough to sew with so far.  That was an AMAZING idea to take threads from the actual fabric to sew with! 

All in all I am happy with my progress.  I am still so excited about finally figuring it out I want to stay up longer just to sew, however I know that won't last long. 

One other major discovery was made while sewing tonight...Disturbed & Godsmack make great sewing songs!!! 

Hope you all have a glorious week!

Cheers ~ Rogue

Saturday, August 6, 2011

And...its begun =)

Well tonight after having family over for dinner, which forced me to clean my sewing/armoring table (aka the kitchen table) off so we could eat, I decided to get some good use out of it before I cluttered it up again!  I cut out the first piece of my ACC garb.  My white linen undershirt. 

It is a very basic design based on the Thorsbjerg tunic & the Viborg linen smock.  Its a rectangular body & rectangular arms with a taper to the wrist.  A simple round neckline with side seems to the hip, open past the hips.

Now that its cut out I still have to figure out a few things.

1) The Neck: I want to put the neck slit over to the side so its basically on my shoulder.  I think it looks so much better that way.  Or I could just do a simple boat neck & still get the flat lay I want under the opening of my kirtle.  I just can't decide! 

2) Seams:  Should I flat fell all the seams?  I know on the Thorsbjerg tunic the seams are in the middle of the arm instead of at the shoulder seam and underarm seam, so I am unsure where to put them.  And in a flat felled seam should everything be a running stitch?  I may do a blanket stitch in a coordinating color on the neck & cuffs but again...not sure!

3) I'm kind of perplexed at how to set up the flat felled seam to start.  I have seen Bianca do it, looked at her hand outs, even seen some photos on youtube but still am hesitant to start it all.  That initial desire for hand holding is killin' me LOL! 

4) Gussets: I am not sure if I should add gussets under the arms or not.  I have enough linen left from the arms to cut them out if I need them but deciding if I should add them is the dilemma!


Now...for my Kirtle question!

In searching for more linen, I found this wool in the wrong box.  Its a maroonish red with heather accents.  I think it will be fine but I am wondering about the pattern...I don't want something that wouldn't work in period.  Any ideas if the Herringbone will work anyone?


UPDATE!  I found references to "the interlacement of the herringbone or broken chevron twill weave"  so YAY I have my Kirtle Wool =) 

Tuesday, July 12, 2011

The Wool Cloak...

After talking to Ralf about the style of cloak an 11th Cent. Norman would wear, my rectangular idea was not going to work.  It needs to be a circle cloak.  However I only have a 2 yards/60"wide piece of wool (along with the wool for the trim) to use for the cloak.  Therefore I thought my budget was going to get blown on more wool.  However, thanks to Duke Konrad von Krixen...I now have another option!  http://www.personal.utulsa.edu/~marc-carlson/cloth/bockclok.html shows how to use a smaller cut of fabric for a semi-circular cloak.  So, this Saturday I am heading over to Ralf & Kassandra's to help them make garb for Leo since they are bringing him to Baron's War to camp (we aren't allowed to camp without him anymore declared the littlest Norman!) so we are going to test out the pattern and see how it works out.  If all goes well I will be using the blue on the left as the trim around the entire cloak & the black woven wool for the body of my cloak.  It will pin at the shoulder with a pennanular brooch which I may or may not try and create since I already have one.


So at least the cloak has been decided on...hopefully =)

Saturday, July 9, 2011

More than I ever expected to know about Linen Thread...


Well this is what $35 worth of Linen thread looks like lol.  I went ahead and matched ALL of my stash of linen fabric so that when the time comes I can reorder the correct colors online.  Turns out DMC has a line of Linen thread but you can only get it in 12-packs online.  There are a total of 24 colors in that line of floss.  I have found that Londonderry Linen Thread, the 80/3 thickness is just about perfect and there are some pretty good guides online with fairly true to color photos.  So I at least have more options now when I want completely period materials.  I also seem to remember a merchant at Uprising that carried a lot of linen thread as well and next year I will be sure to take my swatches with me! 

On a side note - today I found probably THE most amazing deal ever.  At this strange little damaged freight store called NPS Market Square here in SLC they get odd lots of stuff.  Today, they had 2 Deacon's Robes and they were $20.99 each.  I purchased one after getting confirmation that it would absolutely work as a Byzantine Dalmatica with some major beading hehe and so I was quite happy.  Then I came home, found out that just ONE of these bad boys is $550.00 to have made then you add in the Normandy trim at $30/yard, of which the whole thing is trimmed in it...turns out I got a $700 outfit for one hell of a deal.  So...I did what any good bargain hunter does...I went back and got the other one!  I figure it fits in my period, my personae and doesn't look bad on.  I already have linen that matches it perfectly so why not get it as a future project.  And if Magnus or I should ever end up winning Crown...I have our stepping up garb >;p


So it was a full day of good shopping karma indeed =)

Rogue

Thursday, June 30, 2011

The Artemisian Costuming Challenge

The Challenge
I am issuing a challenge dedicated to historical costumers everywhere: to create a complete man's, woman's or child's outfit of any social class from the skin out, including an accessory, in six months. That's less than one layer or accessory per month - you can do it!
The Details
You'll have from June 20 to December 31 to plan, buy for, cut, stitch, assemble, complete, and photograph for submission an outfit from the skin out. This will be made up as follows:
Layer 1:  The skin layer.   Create underclothes that someone from your selected time period would have worn.  Examples include braises, drawers, smock, chemise, camacia, shift, gomlek, corsetry and so on.
Layer 2: The main garment.  Create the main garment from your selected time period.  Examples include kirtle, gamurra, kosode & hakama, chausses, sarafan, bliaut, cotehardie, doublet, the toga and so on.
Layer 3: The outer layer. Create a garment that would have been worn for warmth or formal occasions.  Examples include ropa, saia, surcoat, jerkin, coat, peplos, kaftan, entari, a stola and so on.
Layer 4: An accessory.  This could be shoes, jewelry, a hat, stockings, a handkerchief, gloves, a suit of ruffs, an almoner’s purse, and so on.
Any questions about which piece qualifies for which layer need to be determined prior to entering the competition.
All who take up the challenge will have their photos, a short bio, and a description of their proposed outfit listed on the Artemisian Costumer’s Challenge website. 
To enter, please send an e-mail to biancaraven@aol.com with these details listed:
  • your name
  • your location (Where in Artemisia do you call home?)
  • a short (two to three sentence-length) bio, including whether you are a novice (as defined below)
  • a short description of your proposed four-layer outfit
  • a disclaimer with permission to publish your name and pictures to the internet
  • the URL to your blog (if you have one) so it can be linked to your profile
Please ensure your head/shoulders photo is attached.
Official entries will be accepted until the July 25, which is the last day of Baron’s War.
All entrants will be required to send me individual progress photos (one per week maximum) on or before the last day of each month, along with photos of their outfits when completed, which will be shared on the internet so we can all follow along.  The final photo/s of the completed outfit need to be sent to me no later than the New Year’s Day 2012.  The winners will be announced at Gryphon’s Lair Twelfth Night & Baronial Investiture.
 The Rules
  1. Basic documentation will be provided by the entrant.  Your documentation must explain each item in your competition ensemble.  It should define:
·        What each piece is called and what layer it represents
·        When (time period) and where (geography) the pieces would have been worn
·        The materials used for construction in period and in your ensemble
·        If you drafted your own pattern or used a commercial pattern
·        If you assembled the pieces by hand or by machine
·        Any additional embellishments you made by hand, for example: embroidery, hand-woven fabric and/or trim, cast buttons, enameled jewelry, tumbled & polished stones, cured and/or tanned leather, embossed velvet, hand-dying, and so on.
  1. ONE item of underwear and all the upper layers and one accessory must have been made from scratch.
  2. Accessory or embellishment items must have been created entirely during the calendar year of 2011.  For example, if you began making a pair of ghillies based on a class you attended at Estrella XXVII in February of 2011, and you finished them in May of 2011, then the new shoes were created entirely in 2011 and may be used in the competition.  If you began embroidering a smock in 2008 and completed it in June of 2011, the smock was not entirely created in 2011, so it may not be used.
  3. You may barter with other artists and exchange goods to be used in this project.  If you barter, you must document what you made and what you traded for in your documentation.  Pictures of the entrant’s work must be provided.  For example, milady wants milord to cast buttons for her cotehardie and milord wants a length of milady’s woven trim for his tunic.  Milady must provide photographs of the trim she wove and milord must document the buttons he created. 
  4. If you don't manage to finish all four required levels, you will still be in the running. However, those who attempt and or complete all four levels will end with more points than those who only attempt/complete one or two.
  5. This is a challenge for individuals, not groups, therefore only items sewn independently by the by the entrant will be accepted. However, help with pattern drafting, draping, and/or fitting is allowed. Use of commercial patterns is also allowed.
  6. Anyone may enter multiple outfits if they wish, however points will be allocated on a per-garment/item basis, not cumulatively.
  7. Progress photos must be sent: one every 4 weeks minimum, one every week maximum. This will help to keep you all motivated and enjoying the challenge! Photos of the completed outfit to be submitted to be a minimum of three (front, back and side), or more if you wish. 
  8. Receipts showing that the total expenses for this ensemble were no more than $100.00.  Patterns do not count toward this total.  “Fabric and/or Notion Stashes” may be used.  You may also have a patron purchase materials for you; if you have a patron, your total receipts cannot exceed $200.00.  The patron may not be your significant other or anyone else you share a checking account with.
  9. Points will be awarded to everyone who enters, according to the criteria.  Points will be allocated as follows:
·        10 points for each layer completed.
·        10 points if EVERY layer is completed.
·        10 points for any extra layer/accessory (over and above the four required) completed.
·        5 points for any layer started/attempted but not completed.

Additionally, the points below will be won by the person who best meets the criteria:

  • 10 points to the best attempt at historically accurate DESIGN
  • 10 points to the best attempt at historically accurate CONSTRUCTION 
  • 10 points for each inclusion of the entrant’s HANDWORK other than sewing straight seams, such as hand-made lace, buttons, embroidery, weaving, shoes, use of fur (real or faux) and so on.  To receive the full 10 points, the handwork must be included in the documentation.  Points will not be awarded for bartered goods.
  • 10 points to the best attempt by a sewing NOVICE 
    (A novice for this purpose is someone with less than three years of sewing experience).

The OVERALL WINNER will be the person with the highest total points from ALL categories above. Other winners will be Best Design, Best Construction, Best Handwork, and Best Novice.

http://coteduciel.org/challenge.html